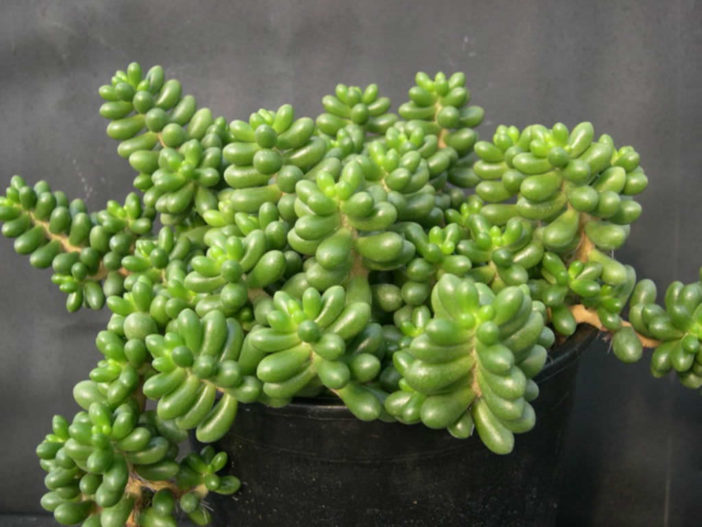
Description Sedum hernandezii is a much-branched succulent with ascending to pendent branched stems and chubby, emerald green leaves arranged in whorls of 5. It can grow up to 6 inches (15 cm) tall. The leaves have the same cracked epidermis as Sedum furfuraceum. They are up to 0.6 inches (1.5 cm) long and up to 0.5 inches (1.3 cm) wide.
The flowers are star-shaped with five yellow petals and appear in clusters at the end of the branches in winter and spring.
Origin Sedum hernandezii is native to Mexico (Puebla). It grows on hill slopes with oak forests at elevations of about 8,200 feet (2,500 m).
Photo via ascotvalegardencentre.com.au Advertisements
Hardiness USDA hardiness zones 9a to 11b: from 20 °F (−6.7 °C) to 50 °F (+10 °C).
How to Grow and Care When growing Sedums, keep in mind that these plants need very little attention or care. They will thrive in conditions many other plants thrive in but do just as well in less hospitable areas. They are ideal for that part of your yard that gets too much sun or too little water to grow anything else. A common name for Sedum is Stonecrop because many gardeners joke that only stones need less care and live longer.
Sedum is easily planted. For shorter varieties, laying the plant on the ground where you want it to grow is usually enough to start the plant there. They will send out roots from wherever they touch the ground and root itself. If you would like to ensure further that the plant will start there, you can add a very thin covering of soil over the plant.
You can break off one of the stems for taller varieties and push it into the ground where you want to grow it. The stem will root very easily, and a new plant will be established in a season or two.
Rhododendrons, with their vibrant blooms and lush foliage, are a popular choice for garden enthusiasts looking to add a touch of elegance to their outdoor spaces. If you're interested in growing and propagating these stunning plants, you've come to the right place. In this article, we'll explore the essential steps and techniques to help you successfully cultivate and propagate Rhododendrons.
While unlikely, if ingested by pets, all parts of azaleas and rhododendrons cause nausea, vomiting, depression, difficulty breathing and even coma. They can be fatal to dogs if eaten in large enough quantities.
To begin, it's important to choose the right location for your Rhododendrons. These plants thrive in partially shaded areas with well-draining soil. Avoid planting them in areas with direct sunlight, as it can scorch the leaves and hinder their growth. Once you've found the perfect spot, prepare the soil by incorporating organic matter, such as compost or peat moss, to improve its fertility and drainage.
When it comes to planting Rhododendrons, timing is crucial. Spring is generally the best time to plant these beauties, as it allows them to establish their root systems before the hot summer months. Dig a hole that is twice the width of the root ball and slightly shallower than its depth. Gently place the plant in the hole, ensuring that the top of the root ball is level with the soil surface. Backfill the hole with soil, firming it gently around the base of the plant.
Once your Rhododendrons are in the ground, proper care and maintenance are essential for their healthy growth. Regular watering is crucial, especially during dry spells, to keep the soil moist but not waterlogged. Mulching around the base of the plants can help retain moisture and suppress weed growth. Additionally, applying a balanced fertilizer formulated for acid-loving plants in early spring will provide the necessary nutrients for robust growth and abundant blooms.
Propagation
If you're interested in propagating Rhododendrons to expand your collection or share with friends, there are several methods you can try. One popular technique is stem cutting propagation. Select a healthy, non-flowering stem and make a clean cut just below a node. Remove the lower leaves, leaving only a few at the top. Dip the cut end in a rooting hormone powder and plant it in a well-draining rooting medium. Place the cutting in a warm, humid environment and mist it regularly. With time and proper care, roots will develop, and you'll have a new Rhododendrum plant to enjoy.
Species rhododendrons can be grown from seed, but cultivars should be propagated from cuttings and layering. Take heel cuttings of rhododendrons in late summer and autumn. Layering rhododendrons involves taking a low-growing branch and pegging it to the ground so it can take root. This is best done in late-summer.
In conclusion, growing and propagating Rhododendrons can be a rewarding and fulfilling experience for any gardening enthusiast. By providing the right conditions, proper care, and exploring propagation techniques, you can enjoy the beauty of these magnificent plants in your own garden and even share their splendor with others.
How to care for rhododendrons
Mulch rhododendrons in borders annually with an acidic mix of leaf mould, peat-free ericaceous compost or conifer bark chippings. For container-grown rhododendrons, replace the top layer of compost with fresh peat-free ericaceous compost, or repot completely in spring and feed with an ericaceous fertiliser. Water with rainwater as much as possible – tap water might contain too much calcium. There should be little or no need to prune, but deadheading spent blooms after flowering can improve the appearance of your shrub.
Rhododendrons: problem solving
The fungal disease rhododendron leaf spot can affect the leaves, causing them to drop. The dark marks are often surrounded by a pinkish-purple ring.This disease, caused by the fungus Glomerella cingulata. Although it's unsightly, leaf spot is only a significant problem on poorly growing or unhealthy plants, which might end up dropping a substantial number of leaves.
Promptly remove and destroy all infected leaves, both on the plant and on the ground. Don't put them on the compost heap. Also, improve the growing conditions - add a mulch of well-rotted compost, and regularly feed and water. Keep deadheading.
Why has my rhododendron died?
Rhododendrons sometimes succumb to over-watering. Too much water around the rootball prevents the roots from being able to take up vita nutrients and can, effectively 'suffocate' the plant. However, under-watering can also kill rhododendrons. Their roots are shallow, meaning they don't have a large tap root with which to draw water up from deep in the soil. Other reasons for sick or dead rhododendrons include planting too deeply (remember rhododendrons are shallow-rooted) and applying too much fertiliser.
To revive a sick rhododendron, first check its roots, and replant it if it's growing in too wet or dry soil, or if planted too deeply. Then, prune away damaged stems. Water sparingly and apply an ericaceous liquid feed as the flower buds are developing in spring, only.
Growing and Propagating Rhododendrons
Rhododendrons, with their vibrant blooms and lush foliage, are a popular choice for garden enthusiasts looking to add a touch of elegance to their outdoor spaces. If you're interested in growing and propagating these stunning plants, you've come to the right place. In this article, we'll explore the essential steps and techniques to help you successfully cultivate and propagate Rhododendrons.
To begin, it's important to choose the right location for your Rhododendrons. These plants thrive in partially shaded areas with well-draining soil. Avoid planting them in areas with direct sunlight, as it can scorch the leaves and hinder their growth. Once you've found the perfect spot, prepare the soil by incorporating organic matter, such as compost or peat moss, to improve its fertility and drainage.
When it comes to planting Rhododendrons, timing is crucial. Spring is generally the best time to plant these beauties, as it allows them to establish their root systems before the hot summer months. Dig a hole that is twice the width of the root ball and slightly shallower than its depth. Gently place the plant in the hole, ensuring that the top of the root ball is level with the soil surface. Backfill the hole with soil, firming it gently around the base of the plant.
Once your Rhododendrons are in the ground, proper care and maintenance are essential for their healthy growth. Regular watering is crucial, especially during dry spells, to keep the soil moist but not waterlogged. Mulching around the base of the plants can help retain moisture and suppress weed growth. Additionally, applying a balanced fertilizer formulated for acid-loving plants in early spring will provide the necessary nutrients for robust growth and abundant blooms.
If you're interested in propagating Rhododendrons to expand your collection or share with friends, there are several methods you can try. One popular technique is stem cutting propagation. Select a healthy, non-flowering stem and make a clean cut just below a node. Remove the lower leaves, leaving only a few at the top. Dip the cut end in a rooting hormone powder and plant it in a well-draining rooting medium. Place the cutting in a warm, humid environment and mist it regularly. With time and proper care, roots will develop, and you'll have a new Rhododendrum plant to enjoy.
In conclusion, growing and propagating Rhododendrons can be a rewarding and fulfilling experience for any gardening enthusiast. By providing the right conditions, proper care, and exploring propagation techniques, you can enjoy the beauty of these magnificent plants in your own garden and even share their splendor with others.
Water at a rate of 1 inch per week throughout the growing season.
Water with rainwater to keep hydrangeas blue.
Hydrangeas do best in moist soil and can wilt in hot weather, so keep well-watered during hot spells in summer.
Mulch hydrangeas every year in spring, with leaf mould, well-rotted manure, or compost. They don't need feeding, as this encourages leafy growth at the expense of flowers.
You can change the colour of the flowers on lace cap and mophead hydrangeas and Hydrangea serrata from pink to blue by feeding with a fertiliser low in phosphorous and high in potassium.
You can grow your plant in a pot of peat-free ericaceous compost and water with rainwater to keep the flowers blue.
Changing hydrangea flowers from blue to pink is trickier. You will need to raise the pH by adding dolomitic lime. It's quite common for a plant to produce a few different coloured flowers on one plant in the first year of growth. Few gardeners concern themselves with trying to change the flower colour – but it's interesting to know why plants may vary.
How to prune hydrangeas
Prune in mid-spring. They produce their flowers on old wood, so don’t prune them back hard, or this summer’s flowers would be lost. Traditionally, the old flowers are left on over winter as it protects the new growth beneath. Cut back the flower head to just above the top set of plump buds that are forming under the dead flower head. This is where the new flowers will form. If you have an overgrown plant, cut some of the stems off at the base.